IM STILL HERE...
Sorry I havent posted in quite a while, but Im still trying to get back up to speed after my health issue...Hopefully, I will be up and running soon and posting new projects that you will enjoy. I just want to thank you for being so understanding. Kathie
Thursday, October 11, 2012
Monday, September 3, 2012
Monday, August 27, 2012
FANTABULOUS CRICUT's "BACK TO SCHOOL"
CRICUT CRAWL!
Summer is coming to an end and we are all getting ready for BACK TO SCHOOL...each Design Team member will be featuring an original BACK TO SCHOOL project that includes a school related item, such as crayons, rulers, pencils, book, school bus, ect. with at least one Cricut cut.
If youve come from visiting Kate at Small Bits of Paper , youre in the right place! If youve just happened across my blog and would like to play along with our Fantabulous Cricut Crawl, start HERE.
Be sure to check out each Design Team members blog for some great inspiration! There will be PRIZES along the way at our Design Team members blogs, and there will be a GRAND PRIZE up for grabs at FANTABULOUS CRICUT for one participant that submits a "BACK TO SCHOOL" project!
How fun is that?
Now, on to my BACK TO SCHOOL projects...


CRICUT CRAWL!
Welcome to Lets Get Scrappy Together and the 8th Fantabulous Cricut Crawl...Fantabulous Cricut's version of a Blog Hop!
Summer is coming to an end and we are all getting ready for BACK TO SCHOOL...each Design Team member will be featuring an original BACK TO SCHOOL project that includes a school related item, such as crayons, rulers, pencils, book, school bus, ect. with at least one Cricut cut.
If youve come from visiting Kate at Small Bits of Paper , youre in the right place! If youve just happened across my blog and would like to play along with our Fantabulous Cricut Crawl, start HERE.
Be sure to check out each Design Team members blog for some great inspiration! There will be PRIZES along the way at our Design Team members blogs, and there will be a GRAND PRIZE up for grabs at FANTABULOUS CRICUT for one participant that submits a "BACK TO SCHOOL" project!
How fun is that?
Now, on to my BACK TO SCHOOL projects...

Bookbag and notepads!
For these projects I used the following cartridge and measurements. Campin' Critters-
backpack (pg 69), cut at 11 1/2 inches...and book (pg 70), cut at 4 inches.
Embellishments used were buttons along with leaf bud green and ocean blue ink. I also left the bed roll off of the top of the backpack to give it more of a bookbag look.
The books can actually be used for little notepads...they have lined paper inserted inside
for writing on.

Front of "pop up" card (5x7)

Inside...arent those lil' worms cute?
For this card I used the following cartridges and measurements. Car Decals-girl #5/family
(pg 63), cut at 1 1/2 inches and boy #5/family (pg 65), cut at 1 1/2 inches...Create a Critter-apple/shadow(pg 25), cut at 3 inches and caterpillar/shadow (pg 54), cut at 2 3/4 inches and 3 inches...Kate's ABCs-welcome back/school days, cut at 1 inch...Plantin SchoolBook-mixed letters and numbers, cut at 1 inch...
This was really an easy card to make and a lot of fun too...The only extras added, were chalkboard paper and the googly eyes! I had planned on using chalk on the inside, but found that it smeared quite a bit...and didnt have a clean look, so I decided to go with a paper that was close to chalk in color.
Okay, are you ready for a chance to win a PRIZE for visiting my blog during our Cricut Crawl? All you have to do is be a follower and leave a comment! I will select a winner using random org...and announce the winner on September 3, 2012...at the start of the new challenge over at FANTABULOUS CRICUT.
THE PRIZE
A
$15.00 gift certificate for Mo's Digital Pencil
This has fast become my favorite site for digital stamps...
Stop by and see all of the cute stamps they have to offer...
you wont be disappointed!
Okay, now its your turn...Lets see your BACK TO SCHOOL projects! Make sure to include a Cricut cut somewhere on your project in order for your project to qualify.
Next stop on the Cricut Crawl...Megans blog, Saxey Designs Stop by and see what she has in store for you today...and when youve finished visiting the Design Team members, make sure you link up your project to Fantabulous Cricut Crawl post to be entered into the contest!
Happy Crawling and enjoy !
Saturday, August 18, 2012
Tuesday, August 14, 2012
WE HAVE A WINNER!
Using random org a winner was chosen and the winner is KARON (karonskraftykorner)! So Karon, if you would please
get a hold of me using the email address located on the right...
I will get you set up with your gift certificate. Congrats!
Also, for those that have become new followers...I would love to return the favor and join your blogs. You can add your blog site to the comment box below and Ill be sure to stop by!
Monday, August 13, 2012
FANTABULOUS CRICUT CHALLENGE #124
THE OLYMPICS!
My kids and I have watched the Olympics pretty much from the start and weve really enjoyed seeing the athletes represent their countries so well in all events, but I must say, swimming, high dive and track/field are our most favorite events of all. So, for my project I decided to make a card with the swim teams in mind. Hope you like it.

THE OLYMPICS!
HI ALL! ITS MONDAY AND YOU KNOW WHAT THAT MEANS...ITS TIME FOR ANOTHER SUPER "CHALLANGE ME MONDAY" OVER AT FANTABULOUS CRICUT ! THIS WEEKS THEME IS INSPIRED BY THE OLYMPIC GAMES THAT HAVE BEEN GOING ON AND ITS UP TO YOU TO CREATE AN AWESOME PROJECT THAT IS SPORT(S) RELATED. SO GET READY, RUN TO YOUR CRAFT AREAS AND GET CRAFTY! DONT FORGET TO CHECK OUT THE OTHER DESIGN TEAM MEMBERS PROJECTS TO GET SOME INSPIRATION OR SIMPLY ENJOY.
My kids and I have watched the Olympics pretty much from the start and weve really enjoyed seeing the athletes represent their countries so well in all events, but I must say, swimming, high dive and track/field are our most favorite events of all. So, for my project I decided to make a card with the swim teams in mind. Hope you like it.

Go for the gold!
For this card I used the following cartridges and measurements. George and Basic Shapes-circles
(pg 108), cut at 1 3/4 inches and 1 1/2 inches, Plantin SchoolBook-letters and numbers, cut at
3/4 inch and Sports Mania-swimmer (pg 68), cut at 1/2 inch, 3/4 inch, 1 inch and 1 1/2 inches.
To make this card I created a mat using red, black and white card stock to place on the black card base. I then cut the Olympic rings using my Gypsy...this was done by placing the smaller circles into the larger ones and cutting. After the rings were made, I simply made a small cut in the yellow and green rings and wove them around the top three rings.
The rest of the card is simply assembling the images and lining up the letters/numbers where youd like them placed.
Thanks so much for stopping by and having a look. Kathie
Friday, August 10, 2012
Welcome to the Back to School Blog Hop, brought to you by the fabulous design teams of Made Especially For You and the GoFish Challenge Blog!

These two design teams have joined together to bring you some fun and crafty inspiration to help you get started on those back to school projects! If you've just come across the hop and would like to start at the beginning, please visit Made Especially For You.
Hello everyone! I hope you all are having a great time
visiting all of the blogs on todays hop and enjoying the wonderful projects the ladies have made. We have some
really talented crafters and you dont want to miss out on any of the inspiration they have to offer...and please dont forget to show your love by leaving a kind word.
Since this is my first ever blog hop that Ive been a part of, I want to celebrate by giving away a

$10.00 gift certificate for Mo's Digital Pencil!
One lucky winner will be selected and announced on August 14th...and all you have to do for a chance to win, is be or become a follower of my blog and leave a comment. Good luck!
Now on to my project...While I was making this card, I couldnt help but think back to when each of my children were just starting school for the first time...watching them wait for the "BIG" yellow bus with their bookbags at the ready and seeing the smiles on their faces as they
wondered what the day held for them. Oh, and lets not forget the joy they had to share once they got home.

Ready, set, go!
For this card I used the following cartridges and measurements. Potpourri Basket-school bus/shadow (pg 63), cut at 5 inches and Plantin SchoolBook-mixed letters and numbers, cut at 3/4 inch.
I also used three of the Mos digital pencil images that are just perfect for a school project.
The first image (Yale) far left was colored using the following Copic markers...Flesh-E000, E00, E01 and R20...Hair-YR20, YR23 and YR31...Outfit-YG91, YG93, YG95, YG97, E35, E37, E44 and E47...Shoes-E53, E55 and E57...Bookbag/books-B21, B23, BV11, BV15, YR04 and YR07.
For the second image (Dundee) center...Flesh-E00, E01, E11 and R20...Hair-E44, E47 and E49...Outfit-B32, B34, B37, R24, R27, G24, G28, Y35 and Y38...Bookbag/books-B93, B97, YR04, YR07, E13, E15, BG11 and BG15.
The third image (Berkley) far right...Flesh-E11, E13, E15 and R22...Hair-E35, E37 and E39...Outfit-B91, B93, B97, RV32, RV34, BV11, BV13, V12 and V15...Bookbag-BG11, BG15 and BG18...Apple-R24 and R27. I also used a little Glossy Accents on the apple.
Thanks for stopping by and enjoy the rest of the hop! Kathie
We have some wonderful sponsors giving away prizes to those who comment on EVERY stop of the hop! Let's see what they have to offer...

$15 Gift Certificate

$20 Gift Certificate

3 images of the winner's choice
Your next stop is PAMs blog.
Here's the entire lineup in case you get lost along the way:
Ashley - http://especiallymade.blogspot.com
Jessica - http://craftinandstampin.blogspot.com/
Cyndy - http://arcyscraps.blogspot.com/
Thanks so much for hopping along with us!
Wednesday, August 1, 2012
GO FISH! CHALLENGE #22-SHAPES
Hello everyone. First, I just want to say what a wonderful turnout we had over at Go Fish! for our last challenge...you all entered some super creations and it was really fun to look at them all. A super job was done by everyone!
And now onto our new challenge...are you ready? Its a SHAPE challenge and youll need to create a project that features either a triangle or circle...or maybe even both. Its all up to you, so get those creative juices flowing and start creating! We cant wait to see what you make this time around.
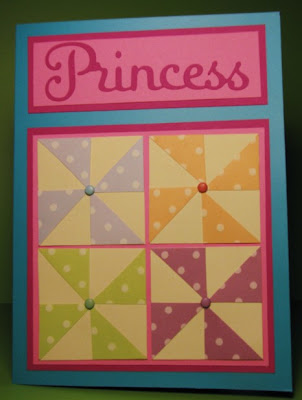
For my project I went with a baby card and used a quilt pattern called Pinwheel...its just a different take on the Variable Star. I hope you like it. Also, dont forget to check out the rest of the Design Teams wonderful creations and most of all, have fun creating!
Baby girl
For this card I used the following cartridge and mearsurement. Sugar and Spice (lite)-Princess,
cut at 1 inch.
To make the base of the quilt square I cut the dark pink paper at 4 1/2"x 4 1/2" and the light pink paper at 4 1/4"x 4 1/4"...I then centered and layered the light pink paper on top of the dark pink paper.
For the four individual squares I cut cream colored paper at 2"x 2"...I then selected the patterned paper I wanted to use and cut eight 1"x 1" squares and cut them evenly from point to point. Once this was done I placed them in the design I had choosen and glued them down with Zig glue and placed a
matching mini brad in the centers. This was then place onto the larger quilt square that
I had made earlier.
Lastly, I made a title block to place at the top of the card. The dark pink paper was cut
at 1 1/2"x 4 1/2" and the light pink was cut at 1 1/4"x 4 1/4"...after the papers were layered,
I centered the title and adhered it to the card.
Thanks so much for stopping by and having a look. Kathie
Monday, July 30, 2012
FANTABULOUS CRICUT CHALLENGE #122
S'MORE ANYONE?
For my project, I decided to make a 12"x 12" layout from a picture that I took of my children while they were camping out on our property and the fact that they were making S'mores (goodies between my daughters) made it the perfect choice!

S'MORE ANYONE?
Its that time again...Time for another super Monday challenge over at Fantabulous Cricut and this week your inspiration is "Smore anyone". So, whatever it is that comes to mind, campouts, barbaques or campfires, let it out and create something fabulous! Dont forget to stop by and check out all of the wonderful projects the Design Team has come up with this week...theyre really super!
For my project, I decided to make a 12"x 12" layout from a picture that I took of my children while they were camping out on our property and the fact that they were making S'mores (goodies between my daughters) made it the perfect choice!

Country nights
For this layout I used the following cartridges and measurements. Campin' Critters-porcupine (pg 34),
cut at 1 1/4, 1 3/4 and 2 1/4 inches, Plantin SchoolBook-letters, cut at 1 inch and Pooh and Friends-
grass/icon (pg 29), cut at 1/2 and 3/4 inches, fence/icon (pg 30), cut at 1 inch.
I used the Martha Stewart punch "Stars" for the night sky, Liquid Pearls and Copic marker E55 for the marshmellows (it gave the marshmellows a puffy golden look...yum), mini brads for the eyes on the porcupine, pop dots on the large/small critter and Copic marker R20 for their bellies/feet and noses.
Lastly, for the campfire, I cut the image from a piece of patterned paper and used Glossy Accents to give it a shiny glow.
Thanks so much for stopping by and having a look. Kathie
Monday, July 23, 2012
SHADES OF GRAY
And for this reason I chose a digital stamp that I have from MosDigitalPencil.com that is called "The Tramp" for the following challenges. The first is over at crafting when we can and its a "monochrome" challenge...the other is over at paper play time and the challenge they have going is a "Miss you" challenge.

When I think of shades of gray, I think of the old silent movies or the classics that starred people like Bette Davis, Myrna Loy, Cary Grant, William Powell...You see where Im going.
And for this reason I chose a digital stamp that I have from MosDigitalPencil.com that is called "The Tramp" for the following challenges. The first is over at crafting when we can and its a "monochrome" challenge...the other is over at paper play time and the challenge they have going is a "Miss you" challenge.

The Tramp
For this card I used the following cartridges and measurements. Art Deco-Pantages Theater
Marquee (pg 41), cut at 1 3/4 inches, Plantin SchoolBook-sentiment, cut at 1/2 inch and Mickey
and Friends-icon/border (pg 114), cut at 1 inch.
I colored the digital stamp using the following Copic markers...C0, C3, C5, C7, B32 and B34. This is the first time Ive done this type of coloring, so I hope it looks alright!
I then centered my sentiment and put pop dots on the underside of the marquee and placed
all of the images on the mat...which is 4 3/4"x 6 3/4" (blue), 4 1/2"x 6 1/2" (black) and 3"x 5" (gray).
Thanks for stopping by and having a look. Kathie
Thursday, July 19, 2012
158 DAYS TILL CHRISTMAS!
So that is just what Ive done...I went ahead and decided to get motivated and create another Christmas card. I will be entering my card into the challenges over at A Muse Studio and Send a Smile 4 Kids.

Christmas is fast approaching and there are still plenty of "Christmas in July" challenges out there for you to take part in to build up your supply of cards...Its also a good way to get one motivated.
So that is just what Ive done...I went ahead and decided to get motivated and create another Christmas card. I will be entering my card into the challenges over at A Muse Studio and Send a Smile 4 Kids.

5"x7"
For this card I used the following cartridge. Plantin SchoolBook-letters/shadows(muliple pages), cut
at 1 inch.
I also used a Magnolia stamp and colored it using the following Copic markers...Flesh-E000, E00, E01
and R20...Outfit/stockings/hair bow-R24 and R27...Gift box-B000, B21, B23, E35 and E37...Hair-E15, E17 and E19.
I made a bow with red satin ribbon and used the same to add across the top.
Thanks so much for stopping by. Kathie
Tuesday, July 17, 2012
PARTY TIME
I made this card for the "I feel the love" project challenge over at Cooking with Cricut . For their challenge you have to create a birthday card for a child. Just hope its not to late.

I dont know why I havent used the "Toy Story" cartridge more often...it really does have some neat images on it. So now Ive made a promise to self...try and use each cartridge that I own before I buy a new one
I made this card for the "I feel the love" project challenge over at Cooking with Cricut . For their challenge you have to create a birthday card for a child. Just hope its not to late.

Howdy!
For this card I used the following cartridges and measurements. Toy Story-Woody #5 (pg33), cut at
6 1/2 inches and Plantin SchoolBook-letters, cut at 1 inch.
When making Woody, I used the following inks to shadow him...coffee bean, navy blue, brown and burnt orange. I also used mini brads and white Liquid Pearls for his shirt buttons. I then finished him off by using yellow Stickles and Glossy Accents.
For the word "party" I simply cut the letters at 1 inch and placed them onto their shadow.
Thanks for looking...I hope you like it. Kathie
Monday, July 16, 2012
"SUNNY DAYS" CHALLANGE

Are you ready for some fun in the sun? If so, then get ready and take part in this weeks challenge over at Fantabulous Cricut Challenge! All you have to do is create something using the sun. It can be a card, layout, tag or what ever else you feel inspires you. So pull out all of your crafty things and start creating! The Design Team has come up with some really great projects, so be sure to stop by and have a look at their work!
For my card I went with a Disney classic. *This card will be donated to the SendASmile4Kids. If you dont know what they are about... you might like to visit their blog and help out.
Summer days!
For this card I used the following cartridges and measurements. Mickey and Friends-Daisy/Donald (pg 105), cut at 5 1/2 inches, sun, grass, clouds (pg 127), cut at sun-1 1/2 inches, grass-1 1/2 inches, clouds-1/2 inch, 1 inch, 1 1/2 inches and Plantin SchoolBook-flower (pg 76), cut at 1/2 inch and 3/4 inch.
There really isnt a lot of embellishment on this card at all, but I did use carnation pink, light pink, navy blue, sky blue and mandarine orange inks for the edges of the images and to give them a little depth and shadow.
Thanks so much for stopping by and having a look. Kathie
*Dont forget to check out the other Design Team members creations and see what a great job they did!
Sunday, July 15, 2012
"CHRISTMAS IN JULY"
HELLO EVERYONE. ITS TIME AGAIN FOR ANOTHER SUPER CHALLENGE OVER AT GO FISH CHALLENGE ..AND ALL YOU HAVE TO DO IS CREATE A WONDERFUL CHRISTMAS PROJECT. SO GET OUT ALL OF YOUR HOLIDAY COLORED PAPERS, EMBELLISHMENTS ECT... AND GET BUSY! IF YOU NEED A LITTLE EXTRA INSPIRATION, BE SURE TO CHECK OUT THE REST OF THE DESIGN TEAM MEMBERS PROJECTS...THEY MADE SOME AWESOME THINGS.For my "Christmas in July" project, I decided to go with a childrens classic and used Winnie the Pooh...along with a few of his friends. I hope you all like it.

Let it snow
For this card I used the following cartridges and measurements. Pooh and Friends-Pooh #2 (pg 18), cut at 2 inches, Piglet #4 (pg40), cut at 1 3/4 inches, Eeyor #2 (pg48), cut at 2 inches, Santa hat/icon (pg 60), cut at 1 inch...Winter Woodland-Snowflake (pg 48), cut at various sizes and Plantin SchoolBook-NOEL, cut at 2 1/4 inches.
I used Diamond stickles to give Poohs hat and the snowflakes a frosty winter fell along with dark purlple, caranation pink and a warm brown ink to give a little depth to the images. Oh, and lets not forget Poohs soft black eyes...for those, I used mini black brads.
Thanks for stopping by...I hope you like it. Kathie
*And dont forget to check out the other Design Team members projects too.
Tuesday, July 10, 2012
Wednesday, July 4, 2012
STATE OF EMERGENCY!
Im sorry that Im unable to post, but West Virginia has been under a State of Emergency since last Friday and Im one of the many thousands that have no electric or phone services. I hope youll understand and please be assured that I will be posting once again, when everything is back up and running. KathieSunday, June 24, 2012
Wednesday, June 20, 2012
PURPLE AND PUNCHES
I made this card to enter into the challenge over at scrapitgirl.net, which is a "Punch" challenge and all thats required is to make a project using any of your punches...The other is over at littlescrappieces.blogspot.com, and its a "Purple" challenge. So, if you have some time, stop by and check them out or even create something to enter.

ONE CARD, TWO CHALLENGES...BOTH USING SOME OF MY FAVORITES. THE COLOR PURPLE AND MY NEW ADDICTION, MARTHA STEWART PUNCHES!
I made this card to enter into the challenge over at scrapitgirl.net, which is a "Punch" challenge and all thats required is to make a project using any of your punches...The other is over at littlescrappieces.blogspot.com, and its a "Purple" challenge. So, if you have some time, stop by and check them out or even create something to enter.

Sweet and simple
For this card I used the following cartridge and measurements. George and Basic Shapes-
oval (pg 114), cut at 3 inches (green) and 2 3/4 inches (lilac).
For this 5" x 7" card, I cut two pieces of paper for the first layer...the lilac paper was cut at
4 3/4" x 4 3/4" and also scored every 1/4" using the Martha Stewart score board...the green paper was cut at 2 3/4" x 3 3/4".
I used the following Martha Stewart punches to make the images...branch punch and 3 in 1 hydrangea punch. I used two shades of green cardstock for the branches and used white cardstock for the flowers. I then colored the flowers using the following Copic markers...V93, V95, BV01, BV02,
B91 and B93. The centers of the flowers are made using Liquid Pearls-Lavender Lace and Baby Blue. All of this was then arranged on a strip of purple ribbon.
The sentiment was made using a stamp and Olive green ink and placed on the matted ovals.
Hope you like it and thanks for stopping by and having a look. Kathie
Tuesday, June 19, 2012
RUBBER DUCKIE...
I made this card for two challenges that are going on right now...The first is for the challenge over at sendasmile4kids.blogspot.com, their challenge is "Birthday Fun For Kids" and the other is over at diecuttindivas.blogspot.com, their challenge is "Summer colors" and you have to make use of the following colors...red, orange and yellow.

EVEN THOUGH MOST OF MY CHILDREN ARE GROWN, I STILL LOVE SEEING THE SESAME STREET CHARATERS (THEYRE SO CUTE)...AND NOW I CAN LOOK FORWARD TO WATCHING ALL OF THEM WITH MY SOON TO BE 1st GRANDBABY!
I made this card for two challenges that are going on right now...The first is for the challenge over at sendasmile4kids.blogspot.com, their challenge is "Birthday Fun For Kids" and the other is over at diecuttindivas.blogspot.com, their challenge is "Summer colors" and you have to make use of the following colors...red, orange and yellow.

Ernie and friend!
For this card I used the following cartridges and measurements. Sesame Street Friends-
Ernie #1 (pg 52), cut at 5 1/2 inches, 1-2-3-4 and 5/icon (pgs 68, 69, 70, 71 and 72), cut at 1 inch and Plantin SchoolBook-sentiment (mixed letters), cut at 3/4 inch.
I really enjoyed making this easel card and it is pretty straight forward to put it all together. I made a mat for the sentiment that measure, 5 1/2" x 5 3/4" (green) and 5"x 5" (white) added two buttons to keep the card positioned and centered the words.
I cut a 6" x 6" square (white) and mounted a 5 1/2" x 5 1/2" square (green) onto it...and from there, I placed Ernie in his proper spot and adhered the numbers around him. Oh, and the little duck was given google eyes!
Thanks for taking the time to stop by and having a look. Kathie
Friday, June 15, 2012
FIRST POST AS A...
The talented Design Team over at gofishchallenges.blogspot.com have created some really great projects for this weeks challenge, which is "CREATE SOMETHING PATRIOTIC". With a theme like this, how could you not get inspired...right? So, this would be a perfect time to pull out all of your July 4th colors or even your home country colors and create something wonderful!
Dont forget to check out the other design team members projects at Go Fish, the ladies have made some really wonderful and inspirational things. You can find them by clicking on their names on the side bar or hitting on the link above. Now for my "something patriotic".

DESIGN TEAM MEMBER FOR GO FISH CHALLENGES!
The talented Design Team over at gofishchallenges.blogspot.com have created some really great projects for this weeks challenge, which is "CREATE SOMETHING PATRIOTIC". With a theme like this, how could you not get inspired...right? So, this would be a perfect time to pull out all of your July 4th colors or even your home country colors and create something wonderful!
Dont forget to check out the other design team members projects at Go Fish, the ladies have made some really wonderful and inspirational things. You can find them by clicking on their names on the side bar or hitting on the link above. Now for my "something patriotic".

Old Glory
For this card I used the following cartridges and measurements. Plantin SchoolBook-mixed letters, cut at 3/4 inches and George and Basic Shapes-square (pg 109), cut at 2 inches.
I started with a 5 1/2"x 8" card that I made using off white cardstock and then cut the red and tan base to mount the image to. The two pieces for the mount were cut at (red) 5 1/4" x 7 3/4" and (tan) 5" x 7 1/4". I then cut 8, 2" squares from the paper I had choosen and folded them into a kite shape...I also cut a 1" x 10" strip of matching paper for the rosette in the center, scored it every 1/4" and finished it off with a red button and a bit of twine.
For the sentiment...I made a mount using blue cardstock, cut at 1 3/4" x 4 3/4" and tan cardstock, cut at 1 1/2"x 4 1/2".
Thanks for stopping by and having a look. Kathie
Saturday, June 9, 2012
THANK YOU CARD
I will be entering this card into the "Garden" challenge at heather-bittenbythebug2.blogspot.com .

I REALLY LOVE THE "ART NOUVEAU" CARTRIDGE...I THINK THE IMAGES ON IT ARE BEAUTIFUL AND CAN BE USED FOR BOTH MEN AND WOMEN.
And because of this...I did indeed attempt to make a "masculine" thank you card. I hope...with fingers crossed.I will be entering this card into the "Garden" challenge at heather-bittenbythebug2.blogspot.com .

Busy little bee
For this card I used the following cartridge and measurements. Art Nouveau-Sunflower (pg 36), cut at 6 1/2 inches and the bee (pg56), cut at 2 1/2 inches.
Like the dragonfly on the previous post...I used vellum on the bees wings. I really love the look this gives, I also inked his body parts with brown and placed him on a pop dots.
The sunflower is pretty straight forward...but I did use a textured wausau paper for the leaves and embossed the center of the flower with the "Swiss Dots" embossing folder.
This was all placed atop of a 4" x 5" mat, then finished off with the sentiment inked onto vellum and adhered with a glue dot
Again, thanks for stopping by and having a look. Kathie.
Friday, June 8, 2012
THE DRAGONFLY...
And for this reason, I chose the dragonfly as my "bug" in the "Dont bug me" challenge over at fantabulouscricut.blogspot.com.

IVE ALWAYS LOVED DRAGONFLIES...AND I CAN SIT ON THE FRONT PORCH FOREVER, JUST WATCHING THEM DART AROUND MY POND AND THEN LANDING ON THE LOTUS FLOWERS...
And for this reason, I chose the dragonfly as my "bug" in the "Dont bug me" challenge over at fantabulouscricut.blogspot.com.

Little dragonfly
For this card I used the following cartridges and measurements. Art Nouveau-water lily (pg 27), cut at 3 1/2 inches and dragonfly (pg 54), cut at 1 1/2 inches. Plantin SchoolBook-mixed letters, cut at 3/4 inches.
I decided to cut all of my images in white cardstock and color them using my Copic markers...I really wanted to give it the feel of being painted with water colors...Flower and sentiment-RV32 and RV34...greenery and dragonfly wings-G24 and G28...dragonfly body-E35, E37, YG20 and YG23.
I also altered the dragonfly (slightly), used vellum for his wings, Liquid Pearls (buttercup) for his eyes and put him on a pop dot to place him above the flower. Oh, and I put pop dots between the flower layers to have the flower open.
Thanks you for stopping by and having a look. Kathie
Wednesday, June 6, 2012
ITS A BIRD, ITS A PLANE, ITS, ITS...
CAPTAIN STARFISH?
I did make this card with the "Bright Colors" challenge in mind, over at sendasmile4kidschallenge.blogspot.com (to be donated)...I dont usually make cards using bright colors, so this was indeed a challenge in two ways, but I think Ill give myself at least a B for effort.

CAPTAIN STARFISH?
I THINK AS A MOM, SPONGEBOB HAS GOT TO BE ONE OF MY FAVORITE CARTOONS TO SIT AND WATCH WITH MY DAUGHTER... WE BOTH GET SUCH A KICK OUT OF IT AND TOTALLY LOVE WHEN THEY MAKE "HAPPY EYES". IT SURE IS A FAR CRY FROM THE FLINTSTONES AND OTHER CARTOONS I GREW UP ON.
I did make this card with the "Bright Colors" challenge in mind, over at sendasmile4kidschallenge.blogspot.com (to be donated)...I dont usually make cards using bright colors, so this was indeed a challenge in two ways, but I think Ill give myself at least a B for effort.

Captain Starfish!
I made this card using the following cartridges and measurements. SpongeBob SquarePants-Patrick #8 (pg 56), cut at 5 inches and Plantin SchoolBook-mixed letters/shadows, cut at 1 inch.
This is a 5"x7" card and has a 4 1/2"x6 1/2" base cut from glitter paper and is trimmed in black cardstock. I used lemon yellow glitter paper and lime green cardstock (inked edges for depth) for Patricks outfit and placed Glossy Accents on his belt and goggles. Patrick is also raised off of the card with pop dots...to make him look like he's flying off of the card...he is a super hero, after all!
The word "super" is simply placed on a shadow cut, but it somehow looks like it's floating on the card.
*Just a side note. The glitter is not loose...its actually in the paper. This way it's safe for little ones.
Thanks for taking the time to stop by and have a look. Kathie
Friday, June 1, 2012
YIPEE!

Oh yeah!
ONE MORE DAY OF SCHOOL LEFT AND SUMMER BREAK BEGINS! THE MICKEY IMAGE ON THIS CARD WILL BE MY KIDS COME MONDAY AFTERNOON...HAPPY, EXCITED AND READY TO LET LOOSE TO ENJOY LIFE!
This card will be added to the others that I am making for Send A Smile 4 Kids.
Oh yeah!
For this card I used the following cartridges and measurements. George and Basic Shapes-star (pg116), cut at 4 3/4 inches, Mickey and Friends-Mickey #3 (pg 81), cut at 5 inches and Wild Card-Celebrate/phrase (pg 59), cut at 4 3/4 inches.
This card was so fun to make and easy too...For Mickey, I decided to cut him out entirely out of white cardstock (except for the base) and color him with Copic markers...Flesh-E000, E00 and E01...Shoes-Y35 and Y38...Pants-R24 and R27...and B000 for the gloves. I then used Glossy Accents for his tail, ears, head and nose. Oh, and Liquid Pearls -white opal for the buttons.
I cut the star, celebrate and base for the sentiment mount out of white shimmer paper. I then placed the word onto black cardstock and placed it on the base of white shimmer paper.
Thanks for looking. Kathie
Wednesday, May 30, 2012
HONOR
So in HONOR of all that have served and continue to serve in the armed forces and protect our freedom...We thank you...and for my sons...I made this for you.
I made this card for the challenge over at fantabulouscricut.blogspot.com for their "Memorial Day" theme and for littlescrappieces.blogspot.com for their "Red" theme.

MY HUSBAND AND I ARE NAVY VETERANS AND COME FROM MILITARY FAMILIES...I HAVE TWO SON THAT ARE ACTIVE DUTY AND ONE THAT IS A MARINE CORPS VET.. I SUPPOSE YOU COULD SAY MILITARY PRIDE RUNS DEEP IN OUR FAMILIES.
So in HONOR of all that have served and continue to serve in the armed forces and protect our freedom...We thank you...and for my sons...I made this for you.
I made this card for the challenge over at fantabulouscricut.blogspot.com for their "Memorial Day" theme and for littlescrappieces.blogspot.com for their "Red" theme.

Pride and Honor
For this card I used the following cartridges and measurements. George and Basic Shapes-star (pg115), cut at 1 3/4 inches and Plantin SchoolBook-letters, cut at 1 inch.
The red rectangle was cut at 4 3/4" x 6 1/2" and the white rectangle was cut at
2 1/4" x 4 3/4".
I wanted to keep this card clean and let it speak for itself...I didnt feel that it needed any inking, other then the edges to conceal the white from the cuts. The only other thing I did, was to make the fringe along the bottom with gold metallic paper.
I hope you like it and I thank you for looking. Kathie
Tuesday, May 29, 2012
FLOWER POWER
Ill be entering this card in the "Pink-a-licious" challenge over at cookingwithcricut.com.

ALL YOU NEED IS LOVE...SOME BELL BOTTOM JEANS, PLATFORM SHOES AND FLOWERS IN YOUR HAIR.
When I saw this digital stamp, I knew I had to have her (plus a few of her friends)...shes just so sweet. If youd like to take a look for yourself, you can check out Tickledpinkstamps.com.au. She has quite a few different style stamps that you just might like.
Ill be entering this card in the "Pink-a-licious" challenge over at cookingwithcricut.com.

Peace
For this card I used the following cartridge and measurements. Plantin SchoolBook-flower (pg76), cut at 1/2 inches, 3/4 inches and 1 inch.
After cutting the flowers out on white cardstock, I colored them with Copic marks to match the flowers in her hair and added large and mini brads for the centers.
The flower girl image was colored using the following Copic markers...theres quite a few, so please be patient. Flesh-E000, E00, E01 and R20...Hair-E11, E13 and E17...Blouse-RV32 and RV34...Jeans-B32 and B34...Eyes/shadow-YG23, YG25, B21 and B23...and finally all of the Flowers-V12, V14, RV32, RV34, B32, B34 and YR65
I used pink satin ribbon around the center of the card and made a bow for the finishing touch.
Thanks for taking the time to stop by and have a look. Kathie
Saturday, May 26, 2012
BREAK TIME!
I originally made this card for one challenge I had in mind, but now it'll be entered into three...it's funny how things seem to work out. Maybe it's for the best though.
My card will be entered into the color challenge and the Design Team call over at gofishchallenges.blogspot.com and also the Bakery challenge over at bittenbythebug2.blogspot.com. I dont know if I'll be selected for the DT or not, but I'll never know unless I give it a try...Nothin' ventured, nothin' gained and no matter what, just keep doing what I love to do!

EVEN THOUGH IM NOT A COFFEE DRINKER, I CANT HELP BUT WANT TO TAKE A SIP...
I originally made this card for one challenge I had in mind, but now it'll be entered into three...it's funny how things seem to work out. Maybe it's for the best though.
My card will be entered into the color challenge and the Design Team call over at gofishchallenges.blogspot.com and also the Bakery challenge over at bittenbythebug2.blogspot.com. I dont know if I'll be selected for the DT or not, but I'll never know unless I give it a try...Nothin' ventured, nothin' gained and no matter what, just keep doing what I love to do!

Mmmm!
This card was made with the following "lite" cartridge and measurements. Love You a Latte-cup #1, cut at 3 1/2 inches and cupcake #3, cut at 3 inches.
This card was pretty easy to make, in that only one cartridge was used and I didnt have to switch out.
As you can see, I used a burnt orange cardstock for the base of the card and then matted a patterned paper to a dark brown piece of cardstock. I then added a piece of ribbon and a bow for some detail to the side. and give it balance.
I also used brown ink for some depth/shadow and Glossy Accents on the coffee and the honey bun (dark brown part)...the bun itself was cut using glitter paper. I used a premade tag, but cut matching paper to fit and placed a stamped sentiment and ribbon on it for the finishing touches.
All the images have pop dots of different thickness to give that extra feel of dimension and the tag is only popped on the right side outer edge.
Thanks for taking the time to have a look...hope you like it. Kathie
Wednesday, May 23, 2012
HOWDY, PARTNER
I made this card for the Buttons, Banners and/or Birthday challenge over at http://diecuttindivas.blogspot.com, but will be sending it off to sendasmile4kidschallenge.blogspot.com, with other cards that I am making for them. If you have a chance, please stop by and see the good thing they are doing.

I THINK THAT I'M TOTALLY IN LOVE WITH MO'S DIGITAL STAMPS...THE IMAGES ARE JUST SO CUTE!
I made this card for the Buttons, Banners and/or Birthday challenge over at http://diecuttindivas.blogspot.com, but will be sending it off to sendasmile4kidschallenge.blogspot.com, with other cards that I am making for them. If you have a chance, please stop by and see the good thing they are doing.

Im the sheriff 'round here!
For this card I used the following cartridge and measurements. Country Life-barn (pg58), cut at
5 1/2 inches, Banners-dog (pg 35), lamb ( pg 41), chicken (pg 43) and the mouse (pg 47), all cut at
1 1/4 inches.
I used the Martha Stewart scoreboard to make the lines for the siding on the barn, brown ink for accent and added the two doors (with pop dots) onto the hayloft (not on cricut cut). I then used the Swiss Dots embossing folder for the silo, inked the roof and side for shadows and placed pop dots behind it (silo) and the roof for depth. I also used buttons on the banner and a piece of twine for the pony.
For the little cowboy by Mos didgital pencil...I used the following Copic to color him...Flesh-E000, E00, E01 and R20...Cowboy hat/holster/star-E53, E55, E57, Y26 and Y28...Pony-B21, B23, E13 and E15...Bottles-YR02, YR04, B000 and R000...Pacifiers-R000 and R20...lastly the diaper-B000
Thanks for stopping by and visiting. Kathie
Monday, May 21, 2012
GUEST DESIGNER...

I WANT TO THANK THE DESIGN TEAM AT fantabulouscricut.blogspot.com FOR GIVING ME THE OPPORTUNITY TO TAKE PART AS A GUEST DESIGNER ON THEIR BLOG...IVE HAD A REALLY GREAT TIME ! THIS IS FOR CHALLENGE #112, YOU DID IT...GRADUATION THEME.

Class of 2012
For this easel card I used the following cartridges and measurements. Paper Dolls Teen Scene-graduation cap (pg 70), cut at 4 1/2 inches and 5 1/2 inches, George and Basic Shapes-square (pg 109), cut at 5 inches and 5 1/2 inches, Wild Card-Congrats (pg 49), cut at 4 1/2 inches, Its your day (pg 38), cut at 4 1/2 inches, Celebrate (pg 59), cut at 3 1/2 inches, stars/icon (pg69), cut at 4 1/2 inches and finally,Hooray (pg48), cut at 3 1/2 inches.
The two graduates are digital stamps from Mosdigitalpencil.com. and are colored with the following Copic markers. Gowns/caps-G24, G28, Y35 and Y38...Skin-E000, E00 and R20...Hair-(boy) E37, E39 (girl) E13, E15 and E17...Jeans-B32, B34 and B37...Tennis shoes-R27 and R46...Tee shirt-B000 and lastly the Diplomas and girl shoes-C0.
*I used a wobble on the girl and pop dots on the lower half of the boys body...I wanted to make it look as if he were actually jumping off the card.
Congratulations to the entire class of 2012! Kathie
Friday, May 18, 2012
LITTLE BO PEEP
HAS LOST HER SHEEP AND DOESNT KNOW WHERE TO FIND THEM.
When I first decided to make cards, I really wanted to be able to donate some of them to a good cause. So, I went searching and found Send A Smile 4 Kids...I think that they're doing a really great thing and I plan on doing my part by making cards for their choosen catagories and sending them in. If you think that you would be interested, take a little visit to their blog and see what it is they do.
The card I made today is for the Button, Ribbons and/or Flowers challenge over at sendasmile4kidschallenge.blogspot.com. .

Pretty in pink
For this card I used the following cartridges and measurements. Toy Story-Bo Peep/Shadow (pg 57), cut at 6 inches and Flower Shoppe-Scallop #1 (pg 13), cut at 2 inches and 1 1/2 inches, plus the heart leaf (pg 22), cut at 1/2 inch.
I wanted this card to be a little girly, so I used a lot of pink and some floral paper and to offset the entire base from the image, I placed Bo Peeps shadow on the checkered green...I inked Bo Peeps outfit and added Liquid Pearls-Flamingo for the dots on her dress and put Glossy Accents on her shoes and eyes.
For the roses...I cut them using white cardstock and inked them with white, light pink and an almost rhaspberry color (my new favorite color). I also placed Liquid Pearls in the centers and added the leaves. Oh, and lets not forget the ribbon and bow!
Thanks for stopping by. Kathie
Wednesday, May 16, 2012
PUTTING ON THE RITZ
I really love the card designs on the Art Deco cartridge...the lines are so clean and true to the style, that I feel you really dont have to add any ink (I cant believe I said that) or embellishments to them. They stand on their own very well and make beautiful backgrounds for any layout or card. I also like the fact that this cartridge has a more mature feel.
The card I made will be entered into the Prom-enade challenge over at fantabulouscricut.blogspot.com. Your project has to have either a tux/dress or prom/dance theme...I really dont have any cartridges with a prom/dance theme, so I went with the tux/dress and made them appear to be dancing.

Shall we dance?
THE ART DECO CARTRIDGE MAY SEEM SOMEWHAT LIMITED TO SOME, BUT I'VE FOUND QUITE A FEW USES FOR IT IN MY CRAFTING.
I really love the card designs on the Art Deco cartridge...the lines are so clean and true to the style, that I feel you really dont have to add any ink (I cant believe I said that) or embellishments to them. They stand on their own very well and make beautiful backgrounds for any layout or card. I also like the fact that this cartridge has a more mature feel.
The card I made will be entered into the Prom-enade challenge over at fantabulouscricut.blogspot.com. Your project has to have either a tux/dress or prom/dance theme...I really dont have any cartridges with a prom/dance theme, so I went with the tux/dress and made them appear to be dancing.

Shall we dance?
For this card I used the Art Deco cartridge and following measurements. Card #2 (pg 63), cut at 8 inches, Cats Meow (pg 44), cut at 6 inces and Sheik (pg 49), cut at 6 3/4 inches.
This card was really enjoyable to make...like I said earlier, there was really no need for a lot of extras on the card, because I think the style and image speaks for itself. Although, I did use velvet flock (black) for the gentlemans hair, Glossy Accents for the top hat and shoes (to show off his spats), a crystal for his tie pin and pearls for the ladys neckless and ear ring. I also used glitter paper for her dress/shoes for a glamorous feel.
I hope you like it...and thank you for taking the time to stop by and have a look. Kathie
Saturday, May 12, 2012
Thursday, May 10, 2012
STILL WITH ME...
I wanted to enter a couple Mothers Day challenges this week...and I know that the whole idea for making the projects that will be entered, is to eventually give them to someone special. But, I still wanted to honor my great grandma because she meant so much to me and our entire family. So, in her memory, I made this recessed window card.
I've entered this card in the Mothers Day challenges over at creativecutterroom.com, exploringcricut.blogspot.com and fantabulouscricut.blogspot.com.


EVENING THOUGH MY GREAT-GRANDMA IS NO LONGER WITH ME HERE ON EARTH, SHE IS ALWAYS IN MY HEART...AND FOR THIS REASON, I MADE THIS MOTHERS DAY CARD IN HONOR OF HER. LOVE YOU GRANDMA.
I wanted to enter a couple Mothers Day challenges this week...and I know that the whole idea for making the projects that will be entered, is to eventually give them to someone special. But, I still wanted to honor my great grandma because she meant so much to me and our entire family. So, in her memory, I made this recessed window card.
I've entered this card in the Mothers Day challenges over at creativecutterroom.com, exploringcricut.blogspot.com and fantabulouscricut.blogspot.com.


In this photo, my great-grandma is holding my grandmother.
For this card I used the following cartridges and measurements. Flower Shoppe-daisy (pg 18), cut at 2 inches and leaf # 5 (pg 26), cut at 2 inches. Wild Card-I thought of you/phrase (pg 54), cut at 5 inches.
As always...I just had to use my inks! I used a goldenrod on the tips of the flower petals and brown on the leaves. I mounted the photo of my grandmothers with the patterned paper I used on the card and some chocolate brown cardstock.
If you are interested in making this type of card, you can find the instructions for it at splitcoaststampers.com. . Simply type in recessed window card in the search engine.
Thanks for taking the time to stop by and have a look. Kathie
Subscribe to:
Posts (Atom)